

Avalanche VMs deep-dive #1: HyperSDK/tokenvm
In this technical series, we introduce and try out Avalanche Subnets VMs. Issue #1 is focused on Ava Labs' HyperSDK and the tokenvm!

Building stuff for devs and node ops on Avalanche

Before we start
This series assumes that you have basic knowledge of Avalanche and Subnets. If “P-Chain” or “Warp Messaging” don’t ring a bell, you should probably read those first:
Avalanche official documentation:
A deep dive into Avalanche Subnets by Luis Nuñez from Chorus One
What is the HyperSDK?

The HyperSDK is an opinionated framework dedicated to making it faster, safer, and easier to launch your optimized blockchain on an Avalanche Subnet. All the code is open-sourced on GitHub at ava-labs/hypersdk.
Developers can leverage the HyperSDK to build “HyperVMs” that will be used to spin up “HyperChains” (AppChains on Avalanche Subnet). By implementing a few interfaces in Go (here is the complete list), developers benefit from Avalanche-optimized data structures and algorithms out of the box. Moreover, all the HyperChains make use of the powerful Avalanche Consensus.
Note: At the time of writing, the HyperSDK is still in alpha and should not be used in production.
HyperSDK features overview
Patrick O’Grady presented HyperSDK’s features at Avalanche Summit II:
TL;DW, here are the main features:
Optimized block execution: Using state pre-fetching, parallel signature verification, as well as parallel transaction execution (the latter not yet included), HyperChains can perform thousands of transactions per second.
Account abstraction: Each HyperVM can support multiple
Authmodules for each type of transaction, making it possible to use custom authentication.Avalanche Warp Messaging support:
AWM enables any Avalanche Subnet to send arbitrary messages to any other Avalanche Subnet in just a few seconds (or less) without relying on a trusted relayer or bridge.
This feature brings native bridging capabilities between all HyperChains.
Customizable storage backends: HyperVMs can store their data (state, blocks, metadata) in any storage backend (defaulting to pebble). This allows dedicated disks for maximum performance, but can also ease data querying (e.g. PostgreSQL to store transaction metadata).
Efficient state management: HyperChains leverage Merkle Radix Tree to significantly reduce on-disk footprint (check out Dan Laine's talk about Ava Labs’ merkledb).
Nonce-less transactions: The HyperSDK does not rely on nonces, which enables users to submit multiple transactions simultaneously.
And much more: see the extended features list on GitHub!
What is the tokenvm?

The tokenvm is a PoC HyperVM created to showcase how to use the HyperSDK. All the code is available in the examples/tokenvm folder of the HyperSDK repository.
The
tokenvmlets anyone create any asset, mint more of their asset, modify the metadata of their asset (if they reveal some info), and burn their asset. Additionally, there is an embedded on-chain exchange that allows anyone to create orders and fill (partial) orders of anyone else.
Check the detailed features list on GitHub.
tokenvm try out
It’s time to try out the tokenvm and see what it’s capable of for ourselves!
To do so, we will create and interact with a tokenvm HyperChain on locally using:
Avalanche CLI to create a local Avalanche network
Ash CLI to create a Subnet, create a
tokenvmHyperChain within it, and add validators to ittoken-clito interact with thetokenvmHyperChainjq to parse JSON outputs
Note: In this tutorial, we won’t use the Avalanche CLI nor Ava Labs' scripts to create/deploy the Subnet so that we can go through all the steps needed in detail.
Project setup
Are you using Windows?
Create a dedicated directory:
mkdir -p ~/Projects/avalanche-vms/tokenvm
cd ~/Projects/avalanche-vms/tokenvm
And install the dependencies using the setup-*.sh script. This script will download and unpack all necessary binaries:
# For Linux
curl -sSfL https://raw.githubusercontent.com/AshAvalanche/avalanche-wizardry/main/avalanche-vms/1-hypersdk-tokenvm/setup-linux.sh | sh -s
# This takes about 1 min
# For MacOS 10.7+, Lion+
curl -sSfL https://raw.githubusercontent.com/AshAvalanche/avalanche-wizardry/main/avalanche-vms/1-hypersdk-tokenvm/setup-macos-amd64.sh | sh -s
# This takes about 1 min
# /!\ You will probably need to whitelist the binaries on first use /!\
# For MacOS 11.0+, Big Sur+
curl -sSfL https://raw.githubusercontent.com/AshAvalanche/avalanche-wizardry/main/avalanche-vms/1-hypersdk-tokenvm/setup-macos-arm64.sh | sh -s
# This takes about 1 min
# /!\ You will probably need to whitelist the binaries on first use /!\
# js is not available for download for MacOS 11.0+, use homebrew:
brew install jq
tokenvm Subnet creation
Local Avalanche network bootstrap
Use the Avalanche CLI to spin up a 5-node local network:
./avalanche network start
Download the avalanche-local.yml configuration file for Ash CLI and set it as default:
curl -sSfL https://raw.githubusercontent.com/AshAvalanche/avalanche-wizardry/main/avalanche-vms/1-hypersdk-tokenvm/avalanche-local.yml -o avalanche-local.yml

export ASH_CONFIG="$PWD/avalanche-local.yml"
export AVALANCHE_NETWORK=local
tokenvm genesis generation
The genesis file specifies the initial state of our HyperChain, including the native token allocations. Use the token-cli to create the genesis from a custom allocations.json file:
cat <<EOF > ./allocations.json
[{"address":"token1rvzhmceq997zntgvravfagsks6w0ryud3rylh4cdvayry0dl97nsjzf3yp", "balance":1000000000000}]
EOF

./token-cli genesis generate ./allocations.json \
  --max-block-units 4000000 \
  --window-target-units 100000000000 \
  --window-target-blocks 30 \
  --genesis-file ./genesis.json
tokenvm installation on the Avalanche nodes
Before the Subnet and HyperChain creation, we need to install the tokenvm on our nodes. This consists in making the VM binary available to AvalancheGo. The nodes controlled by Avalanche CLI store binaries and configuration files in ~/.avalanche-cli.
Let’s create a symlink to the binary in ~/.avalanche-cli/plugins and restart our nodes:
ln -nsf "$PWD/tokenvm" ~/.avalanche-cli/plugins/tHBYNu8ikqo4MWMHehC9iKB9mR5tB3DWzbkYmTfe9buWQ5GZ8

./avalanche network stop && ./avalanche network start
Note: tHBY…5GZ8 is the VM ID of the tokenvm.
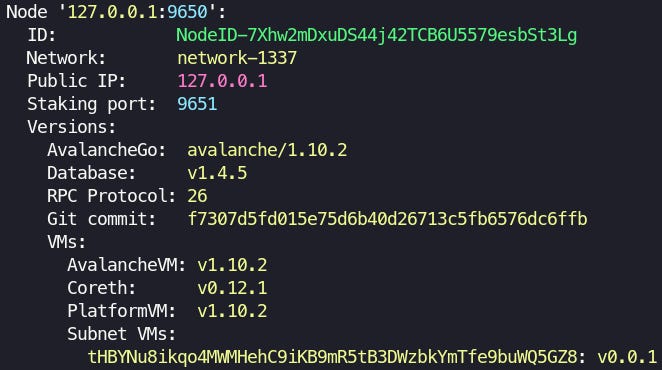
We can verify that our nodes have loaded the VM with the Ash CLI:
./ash avalanche node info
tokenvm HyperChain creation
Let’s create a Subnet, create the tokenvm HyperChain within it, and add validators to it using the Ash CLI. We will use the local pre-funded account to pay for gas fees:
Create a new Subnet
 export AVALANCHE_PRIVATE_KEY='PrivateKey-ewoqjP7PxY4yr3iLTpLisriqt94hdyDFNgchSxGGztUrTXtNN'

 ./ash avalanche subnet create -w
Export the Subnet ID for later reuse (the ID might be different):
export SUBNET_ID=mkVAepSdHXYp6e1sxMwgCV3i1fYzdcGKFLGXBbzsvv4hZWQ8PCreate a blockchain in the Subnet using the
tokenvm(we need to encode the genesis to bytes).# xxd is used to encode the genesis to a bytes string GENESIS_BYTES="$(xxd -p -c 10000 ./genesis.json)" ./ash avalanche blockchain create ashTokenVM \ --subnet-id "$SUBNET_ID" \ --vm-id tHBYNu8ikqo4MWMHehC9iKB9mR5tB3DWzbkYmTfe9buWQ5GZ8 \ --vm-type Custom \ --genesis-str "$GENESIS_BYTES" -w
Export the blockchain ID for later reuse (the ID might be different):
export CHAIN_ID=2bLP6aabd9Hju4SNnn1dsE4Q8FNrAg3N1zeWmzYFky1yDzoFVrAdd the 5 local nodes as validators to the Subnet:
 while read v; do
   ./ash avalanche validator add "$v" 100 \
   --subnet-id "$SUBNET_ID" \
   --start-time "$(date -d '30 sec' --rfc-3339=seconds | sed 's/ /T/')" \
   --end-time "$(date -d '2 days' --rfc-3339=seconds | sed 's/ /T/')"
   sleep 2
 done <<<$(./ash avalanche subnet info 11111111111111111111111111111111LpoYY -j | ./jq -r '.validators[].nodeID')
Create the configuration directories (see subnet-config-dir and chain-config-dir) for the Subnet and the HyperChain and download the configuration files:
 mkdir -p "./chains/$CHAIN_ID"
 mkdir -p ./subnets

 curl -sSfL https://raw.githubusercontent.com/AshAvalanche/avalanche-wizardry/main/avalanche-vms/1-hypersdk-tokenvm/chain-config.json -o "./chains/$CHAIN_ID/config.json"
 curl -sSfL https://raw.githubusercontent.com/AshAvalanche/avalanche-wizardry/main/avalanche-vms/1-hypersdk-tokenvm/subnet-config.json -o "./subnets/$SUBNET_ID.json"
Track the Subnet on the local nodes. To do so, we create a custom configuration for Avalanche CLI where we add the Subnet in the
track-subnetsargument (see Subnet Tracking) and we specify the configuration directories:cat <<EOF > avalanche-cli.json { "node-config": { "track-subnets": "$SUBNET_ID", "subnet-config-dir": "$PWD/subnets", "chain-config-dir": "$PWD/chains" } } EOF echo "Wait for the validation period to start before restarting..." sleep 1m ./avalanche network stop && ./avalanche network start --config avalanche-cli.json
After 2 minutes, we can check that the blockchain is bootstrapped on the nodes:
./ash avalanche node is-bootstrapped "$CHAIN_ID"

token-cli configuration
We first need to import the account's private key in the CLI:
curl -sSfL https://raw.githubusercontent.com/ava-labs/hypersdk/main/examples/tokenvm/demo.pk -o demo.pk

./token-cli key import demo.pk
And then import our tokenvm HyperChain metadata:
chainID:2bLP6aabd9Hju4SNnn1dsE4Q8FNrAg3N1zeWmzYFky1yDzoFVruri:http://127.0.0.1:9650/ext/bc/2bLP6aabd9Hju4SNnn1dsE4Q8FNrAg3N1zeWmzYFky1yDzoFVr
./token-cli chain import

We are all set to start using our local tokenvm HyperChain! 🥳
tokenvm interactions
Assets minting and trading
You can now use the token-cli to mint and trade assets. All the instructions are available on the HyperSDK GitHub repository at Mint and Trade.
Here are the first steps:
Check the account $TKN balance

Create a new asset and mint tokens to the account


Try it yourself by following the Mint and Trade section.
Benchmarking with the spam command
The token-cli has a spam command that gives an idea of the throughput HyperChains could reach!
./token-cli spam run

These inputs will:
Create 10 accounts and distribute an equal portion of the native token to each account (e.g.
9.999933243)Initiate 10 TPS from each account
→ 100 TPS submitted to the chain

Note: Use CTRL+C to stop the spam command.
Estimation of tokenvm throughput (locally)
Disclaimer: The following benchmark has been conducted on a single computer and cannot be transposed to a production blockchain network.
Computer specs: 32GB RAM, 14-cores/20-threads (max. 4.70GHz), SSD NVMe PCIe 4.0
With this command, we can estimate the maximum throughput of the tokenvm by slowly increasing the number of TPS with different configurations and seeing if all transactions are executed (inflight should stay near 0 and success rate near 100%).
| Inputs | TPS | Result |
| 10 acc. x 10 TPS | 100 | ✅ inflight stays at 0 |
| 10 acc. x 20 TPS | 200 | ✅ inflight stays near 0, max inflight: 1K, s.r.:100% |
| 10 acc. x 50 TPS | 500 | ✅ inflight stays near 0, max inflight: 6K, s.r.:100% |
| 20 acc. x 40 TPS | 800 | ✅ inflight stays near 0, max inflight: 10K, s.r.:100% |
| 20 acc. x 50 TPS | 1,000 | ✅ inflight stays near 0, max inflight: 15K, s.r.:100% |
| 20 acc. x 75 TPS | 1,500 | ✅ inflight stays near 1,500, max inflight: 36K, s.r.:96.87% |
| 20 acc. x 100 TPS | 2,000 | ✅ inflight stays near 0, max inflight: 34K, s.r.:100% |
| 22 acc. x 100 TPS | 2,200 | 🆗 inflight stuck at 30K, max inflight: 34K, s.r.:97.5% |
| 30 acc. x 100 TPS | 3,000 | 🆘 inflight stuck at max inflight: 72K, s.r.:83% |
We can reach a sustained 2,200 TPS rate. Pretty cool for a local network!
Network teardown
To stop the Avalanche network:
./avalanche network stop
Wrapping up
What a ride! I hope you enjoyed it as much as I did ^^
What we can say from this deep dive is that:
Deploying a HyperChain is already possible today! It was not trivial to deploy the
tokenvmwithout Ava Labs tooling but we did it.The Ash CLI works pretty nicely
The
tokenvmis already capable of a very nice TPS rate on a local network
What's next?
We should probably benchmark the tokenvm on a proper environment, why not on Fuji... Stay tuned for more wizardry!


